History
The very first space station I built was rather small : 4 x 6 baseplates (each 32x32 studs), which means 1x1,5m. It wasn't bad, but I couldn't expand because my bedroom was not large enough, the station was small enough to fit under my bed ...
I realised an extention as soon as I moved my bedroom to the 1st floor of the house, as we had finished the renovation. I had much more space and it was perfect for what I planned. I added some baseplates to store my vehicules :some "X-wing" Blaktron, some M-Tron and self-built stuff. Then I expanded and built a town beside the original space station. A real town with shops and houses, cars and so on. The whole stuff was not 4 x 6 anymore, but 6 x 16 ...
I had built something very big, but so empty ... There wasn't many buildings on that station, I had not enough bricks to create the buildings that would have fit in relation to the size ...
And there still wasn't enough space for the vehicules. Moreover, they were simply placed one behing the next one, it wasn't looking that "sexy" ... Too large (but too few space, notice the complexity), boring, So I decided to built a new one. That new one was supposed to have small hills. I bought wood (2 bricks high) and nailed 32 stud large squares of wood together and set my baseplates on them to create "altitude".
The result was a disaster. The plates were not exactly 2 bricks high, they were not exactly 32x32 studs large, and because I nailed all that stuff, it wasnt flexible at all ... I had needed less than 6 months to create this heavy monster and I already had regrets before it was even finished ...
That was the start of a this project : to create a new space colony with flexibility, space for the starships, but not so large than the former construction. I got the idea to create an underground part : the former colony would be the surface of the new colony and I had to design a structure able to carry many levels and the surface.
Then I began studying in Germany and found time to think about the principle of pillars (see chapter "architecture") during the lessons. I also began thinking about technical aspects and the way to use that volume.
I built some modules of that new colony in 1999 and 2000, but it was not efficient because I had not space enough in my room. Now that I moved in august 2001 to my new appartment, I can install all that stuff and take a new start. That's the reason why I create this homepage : you can follow live what happens .d..
Main idea
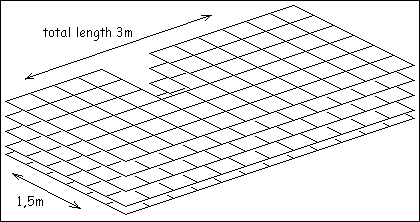 |
The space colony is 6 baseplates (32x32) large and 12 baseplates long. The colony has not only facilities on the surface of the planet, but also underground (over 50 bricks deep). It's not a perfect parallelepiped : some plates are missing to enable access in the middle. It's more somthing like a "U". And even within the "U", some deep parts cannot be reach. |
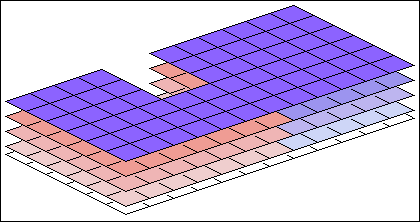 |
In blue, the city. On the surface it's a normal town with houses, shops, airport, etc. and underground on the right side you can find equipments: hangars for civil vehicules, energy tanks and other technical equipment. In red, the space station is located underground, in order to remain protected. You will there also find weapons stocks, control, energy protection and storage facilities and habitation for the military population. I didn't count how many minifigs are to be installed in this station ... |
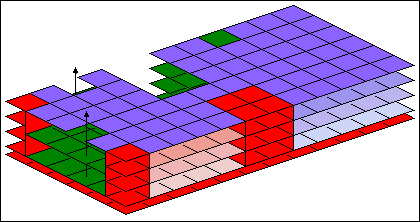 |
In fact, the military sector is not completely underground, a network of high-security vertical bunkers, here in dark red is emerging out of the surface. Underground, the bunkers are separated of the rest of the station by special large walls and connected with eachother by a secret corridor, at the deepest level. The large bunker is a command center for the complete colony and the small ones will mainly used for strategical purposes (weapons, survival area in case of emergency). Such connected vertical bunkers allow the control and access to all areas of the station, at any level from a secure place. |
The hangars, here in green, emerge also to the surface. Elevators bring the aircrafts to the surface to take off, like in aircraft carriers (the arrows show the way the aircrafts use to take off). The hangars within the military sector are in fact higher than the one under the city, as the aircraft need more storing space as the civilian maintenance vehicules ...
|
The general idea is to build areas that can be isolated in case of danger. A very small secret level is located under the lowest "official" deepest floor to connect the secured areas (bunkers) which have access to those different isolable areas. So you can identify several main zones :
- the surface and underground of the town A monorail and small elevators make the transport of goods and people easier within the undergroud levels. |
Architecture
Challenge : creating large floors with Lego
The city I bought when I was younger is on one level, built on 32x32 baseplates (baseplate = road plates for "non-used-to-lego-readers"). Because it was too big (6x16 baseplates, so 1,5x4m), I wanted to reduce it and store all starships and vehicules in several new "underground" hangars despatched on 2 or 3 levels (approximately 50 bricks deep structure). I could even have more space than before to create underground machinery and space to live.
The first idea was to build the deepest floor with 32x32 baseplates, built pillars at each corner of them, to built a second layer of baseplates, new pillars, and so on ... The problem is that baseplates have no studs on their backside. So the layers are slipping and unstable.
 |
 |
 |
|
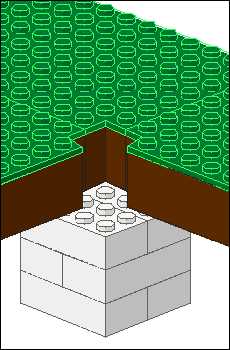
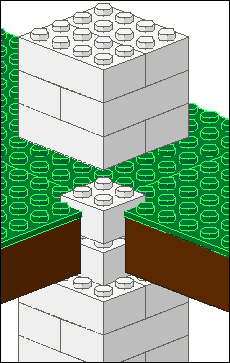
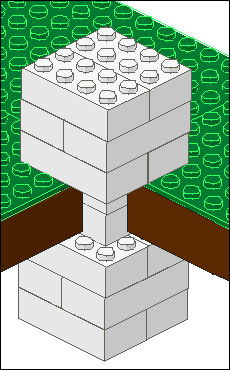
The concept I developped is following : pillars have to ensure stability and maintain the several floors together, that's an evidence. They must be uninterrupted from the bottom to the top of the construction (no slippy levels). Baseplates are not strong enough to carry what was to be built on them, so I decided to put them on thin plates of wood (brown in the picture). Wood + baseplate is stable. But it has to grip on the pillars. And because the core of the pillar must still be made of Lego, I cut the corners of each baseplate (1x1) and can integrate the levels in the sides of the pillars. |
With this solution, pillars are built through all the structure, even if they are thiner where levels have to grip. I only have to take care that wood + baseplate correspond to the spacing between two bricks. Because the pillars are built with regular spacing (one at each corner of a square baseplate), the structure is very stable and can carry heavy floors. Even with a 50 bricks high structure ... you could almost sit on it. But no twist or side pressure is allowed ... |
Another advantage of this combination : I can create and customize floors at the level I want. The pillar is stable because only made of Lego in its core and because the weight of the upper levels keeps everything in place ... On the right side, you can see how a pillar looks like. In this case, it is a pillar located on the side of the city, so 2x4 instead of 4x4. The core of the pillar is apparent. |